Tutorial 04: Making the Observatory Houses
Now we're going to start the houses. We will start with the smaller house at the front of the tower.


Start with a simple cube, then delete the back and bottom face.

Line the cube up to the side of the tower, and make it a bit bigger by pulling around the vertices or the faces (left).
Once we've done this we can start shaping the house. By using the 'Insert Edge Loop' tool under the 'Mesh Tools' toolbar, we can add more edges to be able to shape the point in the roof.

Here I used six edge loops so the house had a bit of a flat top. This will eventually lead the way for the metal clamp holding the metal sheets onto the roof.


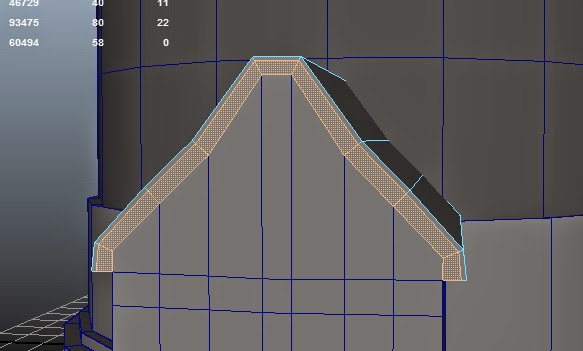
Next we can put two more edge loops around the middle. The loops will try and follow the shape of the object, which we don't want right now, so select the loops and scale them down, which
will straighten the edges.

We're going to use the lower edge loop to pull out the big metal foundation (like we did with the tower). Select the faces and extrude a little outwards.
We can then select the faces of the whole bottom section (the part we just extruded, and the smaller faces that form the ridge) and extract them to keep them separate. This will help later for when you start sculpting or texturing.


Next do the same on the roof, selecting the faces of the top of the house and extruding outwards.
Make another small edge loop, close to the edge of the roof. The thinner section will eventually be the metal sheets that will make up the roof, and the thicker part will be the thick metal support beam, to give the roof an anchor in a storm.
Extract both of these sections to make up the tiered effect.

The reason we need to extract the two sections is so we can have the metal sheets jutting out slightly further than the metal bar (so we can attach it with brackets later).
However, since we extracted the objects, they will not have polys on the underside. These faces will need extruding inwards to finish the main part of the roof.


To create the metal bracket along the top of the roof, we're going to extract the top faces of the 'metal sheet' part of the roof. We can then add extra edge loops to shape it around the roof. I've left a bit of a gap as it bends to give it a more realistic look. Later we will be adding small claw like grippers along
the top too.


The top of the roof can now be replaced by selecting the edge of the right hand side and extruding it to the other side. This can also be done by using the 'Bridge' tool which we'll go into a little later.

If you use the extrude method to recreate the top of the roof, you have to re-merge the vertices. To do this, select the two vertices you want to merge, and go to 'Merge Components' in the 'Edit Mesh' toolbar.

Here I've added two more edge loops on the side of the building. This is to make a nice neat poly to put the window in later on.

Next we want a nice bevel on the metal foundation. Select the outer edge of the foundation and go up to the 'Edit Mesh' menu.
In this menu you can find a tool marked 'Bevel'. This will make a nice smooth diagonal edge on our corner, which will make it look a bit more interesting.
Creating the Window Holes

In my observatory, the windows are round. So we need to make some round shaped holes to put the frame in later.
Create a cylinder, and like the creation of the tower, lower the subdivision axis to 10. This will give us less verts to connect later on. Make sure it's placed in the middle of a single face (Left).
Duplicate is cylinder onto the other side as well.

To make the hole, we're going to use the 'Boolean' tool.
Select the house, and then the first cylinder and go up to the 'Mesh' menu. Find the 'Booleans' tab and go 'Difference'. This hopefully should cut into your mesh like in the picture below.
Repeat this action on the other side


Now we can go ahead and just delete the faces in the middle so we can see straight through (Right).

The face cannot be left the way it is. We will need to reconstruct the mesh in order to keep it neat. This means we will need to draw a lot of extra edges in (right). This can be done with the multicut tool again. Connect up four corner, and run an edge up from the upper mid point, and down from the lower mid point. Then the other two can be run across the middle.
Repeat this on the other side.


Once again, the loop flow needs to match up in the middle. Connect the two middle edge loops. This will also create the faces needed for the door hole later too.
There we go, one house down, one to go. Although a slightly more complicated shape, the other building can be done using the same basic techniques as we've learned throughout the rest of the tutorials.
Next: Tutorial 05: Opening the Doors
No comments:
Post a Comment